
This post contains affiliate links (I get a commission at no extra cost to you for purchases made through links in this post).
RV roof leaks can lead to catastrophic, expensive consequences. Unfortunately, finding a leak in a motorhome can be quite challenging because they have several leak-prone areas and are much bigger than the average vehicle. The good news is that there are a few tricks and tips you can use to spot a leak in your RV roof.
To find a leak in your RV roof, check each seal, look at every appliance on the roof, and check the cabinets and drawers for wood rot. Also, look for roof cracks, pressure test the RV, and trace each water trap that goes into the RV. Looking for roof mold will help you find the source of the leak.
Throughout this article, you’ll find every way you can find leaks throughout your RV’s roof. You’ll also discover a handful of helpful solutions for these leaks.
Check Worn Seals
Worn, damaged seals are the most common places for RV roof leaks. The type of sealant used on RVs will vary, but normally, it is some caulking around the windows, outer frame, and mounted appliances. Rain, wind, snow, and direct sunlight can damage these seals.
To check for worn seals, use a flashlight to closely inspect each seal on and around your RV’s roof.
Once you spot the leak, you need to figure out what type of caulking or sealant you can use for your RV roof since different RV roof types will require different products, but more on that, you can read about in my other article here.
Most RV roofs can be resealed with either a self-leveling lap sealant like this one from Dicor (Amazon affiliate link) or, my personal favorite, the multipurpose adhesive sealant from Sika Flex (Amazon affiliate link)
When you have figured out what type of sealant you should use, you need to research the proper way of applying it, but it is normally very easy! And usually something along the lines of those steps below;
- Use a putty knife to remove the old adhesive or sealant if needed.
- Clean the area with a rag and denatured alcohol.
- Reapply the caulking directly to the gap.
- Let the sealant dry.
- Clean the wet, moldy areas that might’ve formed in your RV and dry them.
Most times, you won’t need to remove the old sealant but instead apply new on top of the old, but more on that in this article below that explains more about when you don’t need to remove the old one as well as how to reapply new lap sealant.
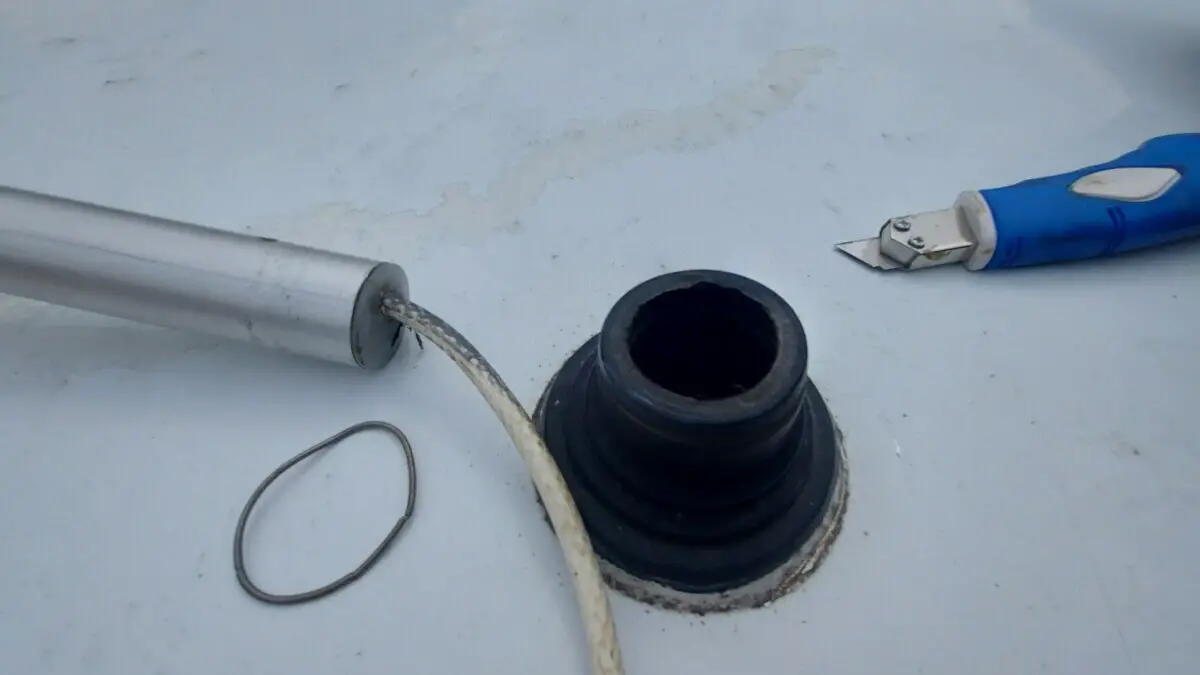
Monitor Every Roof-Mounted Appliance

Almost all RVs have appliances on the roof. Ketelsen RV explains most RVs have dishes, solar panels, roof fans, and other appliances that use various sealants and screws to secure them. Once these adhesives wear down, rust, or strip, rainwater, dew, and humidity can leak into the RV.
Climb on the roof (if possible) and check the condition of the sealant around the attached appliances. Much like repairing worn seals, you’ll have to remove the old screws and adhesives, then clean the area before applying new ones.
Note: Roof fans are some of the most leak-prone devices on your RV. Make sure you close the vent completely, especially before it rains. If it still leaks, there’s likely a loose seal around the edges.
Inspect Each Cabinet and Drawer
RV roof leaks often form around the edges, where all the cabinets are. Checking the cabinets will let you know if there’s a roof leak above them. Sadly, these leaks can go undetected for long periods, especially if you don’t use your RV very often.
Most leaky cabinets and drawers feel warmer and moister than the rest of the RV. Open the cabinet and see if it feels warm or wet. This is often a sign of wood rot and mildew, both of which grow from moisture.
If you notice this issue, use a mixture of one part of white vinegar and one part of water to scrub the cabinet or drawer. You should also look for a leak on the roof directly above the mildewy cabinet or drawers.
But remember that the origin of the leak also could be far away; for example, if you find rotten wood down by the floor, maybe the leak is from the roof, only that the water has been coming down from the roof leak via the wall and accumulated down by the floor where you notice it.
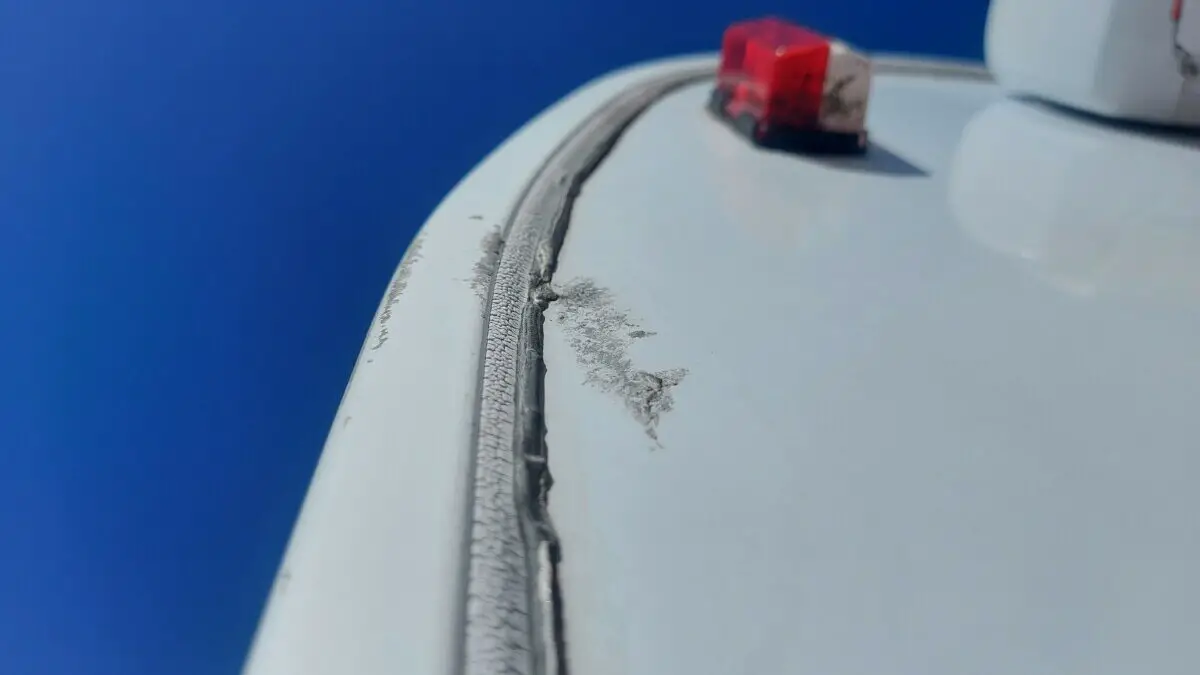
Locate All Roof Cracks
Roof cracks are the most obvious leaks. Small hairline fractures can be just as problematic as big ones. They’re mainly caused by debris falling in the middle of the roof, but people walking on an old, worn roof can also crack it.
Repairing a cracked RV roof can be costly, depending on the type of roof you have, and it may require replacing the whole roof. Or if you have an older RV, maybe you choose to seal up the crack with some EternaBond Tape (Amazon link).
Cracks are more common in fiberglass roofs. Rubber RV roofs rarely crack because they’re designed to bend with shifting weight.
While aluminum RV roofs can dent, it’s rare for them to crack. However, watching for rust and corrosion that can cause a leak into the RV through the roof would be best. To maintain it, you can use an elastomeric roof coating sealant like the Ames maximum stretch. You can find it here on amazon.
Pressure Test the RV
According to RV Blogger, you can hire a motorhome mechanic to pressure test your RV. This works by increasing the pressure in the motorhome, which pushes air outside of the vehicle.
Here’s the step-by-step process of RV leak pressure testing:
- Place a vacuum in the RV and connect it to the vent fan.
- Close all other vents, doors, windows, and other places that promote airflow.
- Turn on the vacuum, then pour soapy water over the RV roof.
- Look for bubbles (this shows where the air is coming through the roof, AKA a leak).
Although I have never done this, it seems like a cool solution that could be great to try out.
Follow the Water Drops on the Roof
Do It Yourself RV recommends tracing the water drops going at an angle on the roof. If all the water pours in one direction, the roof is likely sloped toward a dent or a crack.
Keep in mind that not all leaks are on the roof. Many RV owners see water on the floor and think it’s dripping from the ceiling. However, your water pump can leak at night, causing you to wake up with a puddle on the floor.
Look for Mold and Mildew Growth
Mold and mildew require water to form, survive, and thrive. Wherever there’s a leak, mold, and mildew will likely grow. You can check all of the appliances, storage spaces, and other areas around your RV to know if there’s a leak based on the amount of mold growth.
There’s a thin layer between the RV roof and the ceiling you see inside the vehicle. If that area gets wet and moldy, it’ll start to dip. You might notice water spots or rippled paint because the leak bursts through the roof. Keep an eye out for water stains, too.
Conclusion
Motorhome roof leaks are tough to deal with, but the above suggestions will help you locate and repair the leak as quickly as possible. The sooner you discover the leak, the less likely you’ll encounter an expensive repair. Leaks can ruin appliances, so make sure you find them quickly.
Check your seals and caulking all around the RV, especially on the roof, at least once a year, more likely twice, or get it as a routine that every time you wash your RV, you check for bad seals and learn how to reseal it yourself.
The first place you want to check for leaks is anywhere seals may have deteriorated over time. Check for cracks, thinning, worn spots and other damage.
Hi Linda, yes, I definitely agree; old seals are probably the most common cause of leaks.
RV roof leakage is an inevitable thing. As you drive your RV in different climate conditions, it becomes prone to leakage and impairments. Finding a leak as early as possible with proper inspection or with pressure testing brings you a benefit of timely management or repairing that can save you from further loss saving time and money. For repairing purposes, must use a durable and long lasting sealant that gives you long term benefits with peace of mind
Definitely agree; the right product for the job is super important!