This post contains affiliate links (I get a commission at no extra cost to you for purchases made through links in this post).
Your RV roof is a crucial part of your vehicle. It provides security and privacy besides shielding you from the elements. Because of that, you must ensure it’s well-maintained, which includes applying Dicor lap sealant to the roof when necessary.
Apply Dicor lap sealant to your RV roof by washing the roof and old sealant; if your old sealant shows signs of coming off, remove it. After that, apply the sealant with a caulking gun, and let the self-leveling Dicor lap sealant spread out itself, or spread out the non-leveling one. After 48 hours, it is 80% cured.
Applying Dicor lap sealant to an RV roof is a breeze, but you must follow a few guidelines to get the best results. Read on for insights into those guidelines and more tips.
1. Identify the Type of RV Roof You Have
It is important to know what type of RV roof you have, as that could limit your choice of products that you would be able to use on your RV.
Rest assured, if you are only planning on using Dicor lap-sealant and cleaning the roof with simple green or by only touching up old seals and cleaning those with denatured alcohol, it doesn’t matter, as those products work for every RV owner!
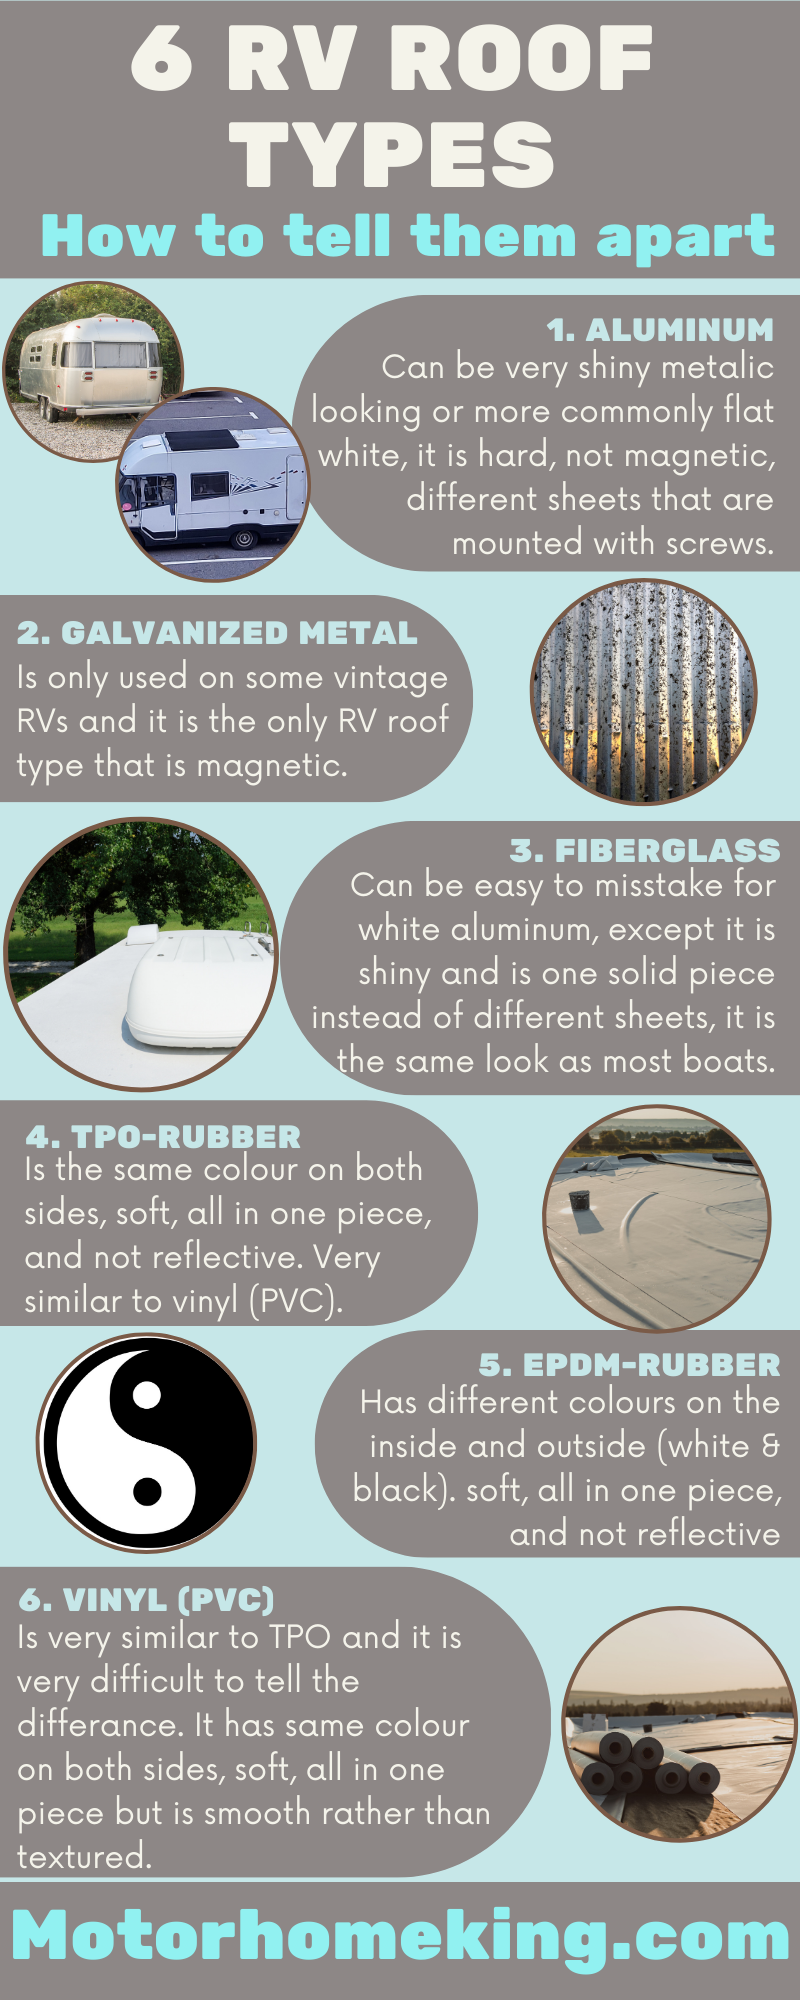
If you are still unsure what type of RV roof you have. If you want to learn so that you are able to buy specialized products for that particular roof, don’t worry, I have made a complete article in more detail on all different RV roof types, how to tell them apart, and what products you can use with which.
If you, on the other hand, only want to use products that work on all RV roofs, don’t worry; the Dicor lap sealant will work for all RV roofs, Simple green will work to clean all RV roofs, and denatured alcohol will work to clean all old seals before reapplying new sealant on top.
Avoid all petroleum-based products like dishwashing soaps such as Dawn or mineral oils.
2. Gather or Order The Items You Need
Before applying lap sealant to your RV roof, you must get the necessary tools and products for the job. Here are the items you’ll need to make the rest of the process hassle-free:
- A specialized RV roof cleaner compatible with your roof type or Simple Green (Amazon affiliate link)
- A soft or medium bristled brush. (Amazon affiliate link)
- A bucket of water.
- A garden hose.
- A ladder to access the roof unless you have one attached to your RV.
- Dicor lap sealant; For horizontal surfaces such as the roof, the self-leveling (Amazon affiliate link) is best as you avoid the mess of spreading it out yourself, but on a vertical surface, you will need one that stays put and does not run down, then you need the non-leveling sealant (Amazon affiliate link)
- A putty knife/ plastic scraper and/or taping knife to spread the non-leveling sealant and/or to remove old sealant.
- Gloves.
- Utility knife
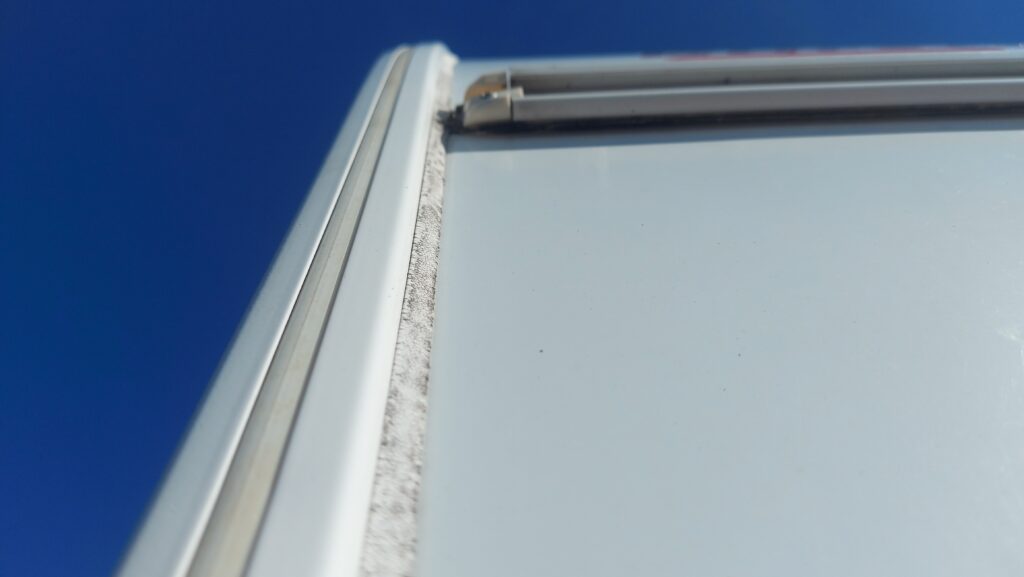
3. Inspect and Clean Your RV Roof
Once you’ve gathered the required equipment, it’s time to prep the roof. Here are the steps to follow:
1. Inspect the RV Roof for Damage
Look for the following:
- Cracks
- Bubbles
- Punctures
- Where the roof membrane has lifted
If you notice extensive damage, ensure you repair the surface before applying sealant. Otherwise, you risk severe problems down the line, including leaks and water damage.
Remember that you should inspect your RV roof at least twice a year and expect to reseal parts of it every year, but more on that and how to inspect it in this article.
2. Clean the Roof
Once you’re confident your vehicle’s roof is in good shape, it’s time to give it a thorough cleaning. Debris on the roof can make it harder to apply sealant and leave flaws that compromise your work, wasting your time and money.
Here’s how you can avoid that:
- Remove loose items, such as leaves and branches,, from the roof. If it’s full of it and you have a leaf blower, guess what? You have an excuse to use it, YES! I have always wanted one! So I just had to look it up, and there are some really cool lightweight battery-powered ones just in the 100-200 dollar range like this one here. (Amazon affiliate link) Check it out!
- Rinse off the roof to remove any excess dust or debris with a water hose; if you are thinking about using a pressure washer, you should read this article first, as it could damage your roof if done wrong.
- Next, use the Cleaning product that you choose or Simple Green as instructed on the label, but usually, it is by mixing it into a bucket of water. Then Apply the solution evenly to the roof, working in sections and starting from the top down.
- Scrub away residue dirt on the surface using a soft or medium bristled brush. To avoid damaging the roof, use a circular motion, and don’t apply too much pressure.
- Rinse the roof until the soapy water drains away using the garden hose.
- Let the roof dry thoroughly before proceeding with the next step.
Tip: Once your RV roof is completely dry, reinspect it to ensure there’s no leftover debris. If some areas need additional cleaning, be sure to do that. Remember, a clean and dry surface ensures successful lap sealant application.
That said, these are just general steps. For an in-depth rundown of how to clean your RV roof and the best products to use, be sure to read this guide.
4. Remove Loose Old Sealant
If you have an old lap-sealant that is starting to get old and get loose, remember that you need to remove it! On the other hand, if you have an old sealant that is sticking well to the roof but you have a crack in it, you can apply the new sealant on top of the old one after you have cleaned it well.
If you are unsure, I have a detailed article describing when you can use a new lap-sealant over an old one here.
5. Cut the Tip of the Dicor Lap-Sealant Tube
Now that your RV roof is dry let’s prepare the sealant tube for the task at hand. Here are a few steps to follow:
- Remove any cap or plug on the tube.
- Cut the tip of the tube. Using a pair of scissors or a utility knife, start cutting the tube’s tip. The size will vary with the area you need to seal, but a rule of thumb is to start with ¼ inches. Expand the opening if the area is large, but if you’re working on a smaller area, a small opening should be enough.
- Ensure you cut the tip at an angle. That will come in handy when you need to maneuver tight spaces on the roof.
- Hold the tube upright, then squeeze it gently. That will help remove any air bubbles inside.
- Clean the tip using a clean, dry cloth. Next, wipe the tube’s tip using a clean, lint-free piece of cloth to remove any residue that may block it or cause inconsistency when applying the sealant.
Remember it is always better to start cutting a small hole and test it, you can always make it bigger later on! It will also be easier to apply it in the right areas that way.
6. Apply the Lap-Sealant in a Continuous Bead
Now it’s time to apply the lap sealant to your roof. To get the best results, you must do that systematically, starting from top to down. Otherwise, the sealant won’t cure well, or you may have an inconsistent layer.
For the best results, here are a few guidelines to follow:
- Start at the highest point on your RV roof. To reduce wastage, I recommend starting at the highest point on your vehicle. That allows the sealant to flow downward, covering the required area instead of flowing to where you don’t need it.
- Work your way down. The trick is to be slow and steady. Apply consistent pressure on the tube as you work on the area to get a uniform application and reduce bumps.
- Apply as much sealant as necessary. Keep adding more sealant to the area. If necessary, ensure the new sealant coats the old one completely, reducing the chances of future water penetration.
7. Spread the Sealant With a Taping Knife If It is Non-Leveling
After applying Dicor self-leveling lap sealant on a horizontal surface, you need to wait about 5 minutes for it to spread out evenly and nicely by itself.
On the other hand, if you use a non-leveling lap sealant made for vertical surfaces, you must spread it out yourself evenly before it cures. That ensures the product covers all voids and provides the highest protection, and looks good.
Using a taping knife or a plastic scraper to do so is a good way of not getting too messy yourself, as well as getting an even nice-looking layer.
8. Let the Sealant Cure for 48 Hours
Now that you’ve finished applying your Dicor sealant give it enough time to cure before exposing your RV to moisture or water. I recommend aiming for at least 48 hours of uninterrupted curing. It will be waterproof already within 4 hours, but to cure 80%, it takes 48 hours, and to fully cure, it takes a month.
That way, the sealant will fully bond, creating a durable, protective layer on the roof. During that time, ensure the area you applied the sealant to is dry and debris-free.
Once the sealant cures, rest assured your roof is well protected from water leakage and damage for up to 3 years (if you keep it well-maintained).
Here’s a quick video summary of the steps to follow when applying lap sealant to your RV roof:
Tips for Maintaining Your RV Roof
Applying lap sealant to your RV roof isn’t the only solution to keep it in the best condition. Notably, you must observe a strict maintenance schedule to extend its lifespan. In that regard, here are a few essential tips for maintaining your camper’s roof:
Clean Your RV Roof Regularly
It’s a no-brainer, but cleaning your vehicle’s roof regularly is a surefire way to prevent dust and other contaminants from accumulating on the surface and discoloring or making it an eyesore.
Besides, a dirty roof is a breeding ground for mold and mildew, which pose respiratory risks besides deteriorating the roof surface. Over time, that can weaken your roof’s structural integrity, reducing its effectiveness in keeping the elements out.
When cleaning the roof, follow the steps I described earlier. Remember to use a cleaning solution that works on your RV roof or Simple Green (Amazon affiliate link), and not to use normal soaps like Dawn, as they are petroleum-based; read more about why that is here.
Inspect the Roof Frequently
Regular inspections are crucial when you own an RV. They help you detect signs of damage early enough, so you can address them and avoid severe problems later. For example, detecting leaks early helps you avoid water damage to the interior.
That said, here are a few things to watch out for when inspecting your vehicle’s roof:
- Punctures
- Tears
- Cracks
- Fading and discoloration
- Leaks
In addition, check the sealants around vents and skylights to ensure they’re intact and don’t have leaks. If you notice cracks or punctures, seal them immediately, maybe with Dicor lap sealant (Amazon link) or another option. Here is an article I made about what sealants RV manufacturers use and recommend.
Note: Generally, you should inspect your RV roof every 6 months. However, if you frequently travel in extreme weather, such as high winds or heavy rain, be sure to check the roof more frequently. Remember, intense heat and cold may also degrade the roof membrane faster than expected, so don’t wait too long before the next inspection.
I try to wash my RV every 3 months and keep an eye out for cracks or leaks every time.
Avoid Parking Under Trees
Parking under trees is one of the potential ways to damage your RV roof. Specifically, tree sap may fall on the roof and discolor it if you delay cleaning it. Besides, the sap can be challenging to remove.
But that’s not all! When you park your RV under a tree with big branches, you risk extensive damage if a branch falls and hits the roof (or any other part).
Note: If you must park your vehicle under a tree, I recommend first trimming the overhanging branches. Additionally, ensure you cover your RV with a cover (Amazon link) to minimize deterioration due to sap.
Apply Rubber Roof Treatment Frequently
Rubber is a versatile and durable product, making it one of the most common materials used on RV roofs (EPDM). However, prolonged exposure to the elements, such as rainfall and intense sunlight, can damage this material. To prevent that, experts recommend applying treatment to your roof every 3 – 4 months.
Rubber roof treatment, usually a liquid solution, creates a protective layer on the membrane, preventing cracking and fading. Besides, the solution forms an anti-static barrier that repels dust and other contaminants, keeping your roof clean.
Remember that roof protection treatments usually are very specific to the various roof types, so ensure that you know what type of RV roof you have first. If you are unsure, remember that I have a guide on how to tell them all apart.
Replace Cracked Seals
The seals around your RV’s skylights and vents are crucial in keeping rainwater out of your RV. However, they may get damaged with time, causing water to seep into your vehicle. As a result, your delicate interior components may get damaged or grow mold.
To avoid that, you must inspect the seals frequently and replace them if you spot signs of damage, such as cracks and gaps. If you need help, consult your user manual or a professional. That way, you’ll know the right seal for your roof and avoid knockoffs.
Final Thoughts
Applying Dicor lap sealant to your RV roof is a surefire way to keep your vehicle in the best shape and maintain a high value. However, you must follow the right procedure to get satisfactory results.
Remember to wash the roof and give the sealant time to cure. Otherwise, you may need to redo the entire surface. Finally, always replace faulty seals and follow the tips above to maintain your roof for years.