This post contains affiliate links (I get a commission at no extra cost to you for purchases made through links in this post).
When it’s time to stop camping for the winter, what do you do with your RV? Can you store it outside, and if you can, how do you prepare it for the extreme temperatures?
To store an RV outside during winter, you’ll need to find a safe space for it, winterize (drain) the water system, cover the entire RV with a cover or build a roof, and remove or charge the batteries throughout the winter. You’ll need to make it pest and critter-proof.
In this article, we will discuss the above points, and more, in full detail. After reading this article, you’ll have enough information to help you safeguard your investment and keep it in one piece until the weather thaws out.
1. Find a Safe Space To Store Your RV
Ideally, the best space for storing your motor home during winter is in enclosed storage. However, if you must store your RV in the yard or driveway, ensure the space is safe and shielded from the wind and in a place without danger of trees or heavy masses of snow falling on it in case of an ice or wind storm.
Remember that if you have a meter of heavy snow on a building’s roof that falls and you have your RV right underneath with already lots of snow on the roof, well, it ain’t gonna be pretty.
If you don’t own a yard or driveway, the street may be the only option. But be sure to find out your city’s regulation for parking RVs on the street, as many cities prohibit this. You should confirm so your actions don’t run afoul of the law.
2. Place a Cover Over Your RV
If you’re stuck storing your RV outside, you should get a cover for it; It will stop meltwater from seeping into the seams/cracks between components and panels of your RV. It is best to build a roof (more about it below) this is because with many covers a lot of RVers experience moisture inside their RVs.
If you don’t have time or space to build a roof solution for your RV that will give you better ventilation, you can always get this RV cover (Amazon affiliate link) as it is all of the below.
The following tips will help ensure that the cover protects the RV adequately all winter:
- Buy a cover that’s made of breathable materials. Whether it is made of polypropylene, polyester, or polyethylene doesn’t matter, as the material’s quality and construction make it breathable. You’ll want a cover that rates high on breathability and water-proofing ability.
- Never use a plastic tarp to cover your RV because it’s not breathable and can trap moisture, leading to the growth of mold and mildew, among other damages. The tarp can also flap around in the strong wind and damage some exterior parts of the RV.
- Wash and dry the inside and outside of your motorhome before putting on the cover. You need one or two people to help you place the cover.
- Ensure that the cover is firmly affixed on all sides, double check to ensure it is secured and will not come off from any side.
- Watch out for sharp edges of the vehicle that can potentially damage the cover.
- Flatten out any antenna on the roof and ensure that the vents on the roof are slightly open so there’ll be proper airflow.
- You’ll want to buy a cover with specific tire covers, as this provides extra protection for the tires.
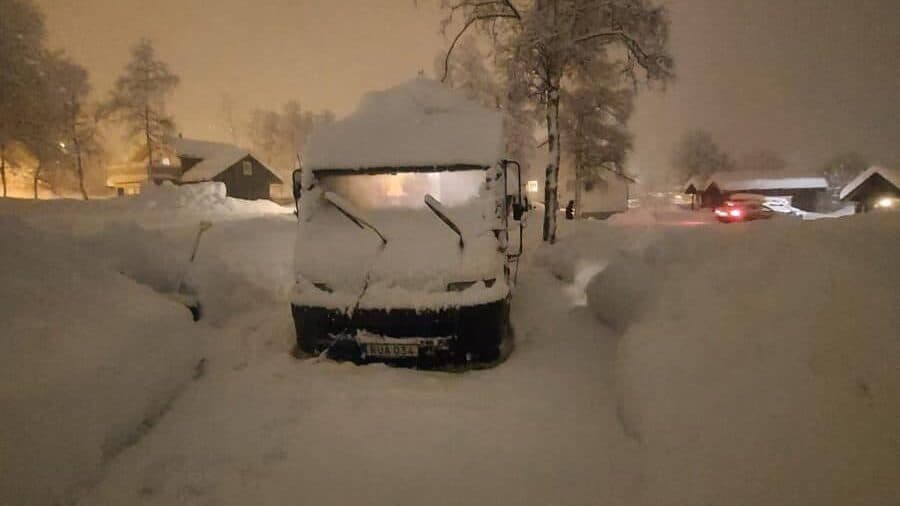
The cover only partially protects the RV from heavy snow, so you’ll need to check how much snow that’s gathering on the RV roof during a snowstorm. If there’s too much, it’ll dent the roof, so make sure you shovel it off periodically. Use a plastic shovel to avoid damaging the surface of the roof.
A good RV cover will have the following features:
- It’s made with materials that provide maximum protection against adverse/harsh weather conditions.
- It’s designed so that it doesn’t require any professional placement. The simple instructions in the manual are enough to place it.
- It should be sturdy, durable, and resistant to all forms of wear and tear.
- It should fit snugly on the RV from the roof to the tires.
The KING BIRD Upgraded Class A RV Cover (Amazon Affiliate Link) is an excellent example of an RV cover with these features and more.
3. Build a Roof To Cover Your RV
A carport or simple shelter will keep your RV sheltered during the winter months better than an RV cover, as snow or ice will not damage it. If you have the budget, space, and time for it, you’ll want to build some shelter to cover your RV or buy one like this metal, heavy-duty carport (Amazon affiliate link)
If you look into buying one as mentioned above, make sure you double-check the measurements needed for it and think twice as to whether or not you want to build one instead. There are also cheaper carports that kind of look like giant tents, but im not sure they would last a long time, especially with some snow.
I have seen people building simple shelters based on a wooden frame that they make the shape of an A and cover with a tarp and place it on top of the RV roof, so it is not even attached to the ground but just standing on the RV roof,
Of course, it would be better to get legs to go with that roof, as it will be a mission every time you want to get it on or off the RV roof. Still, it is a way of making it easy and cheap, and it will make it much better ventilated than using a cover if you want to avoid condensation and moisture build-up inside.
A bonus of a proper shelter is that you can also store your beautiful RV there during the summer months when you’re not traveling, and it’ll keep it safe from hailstorms or falling branches from the trees around.
4. Make the RV Critter and Pest Free
There are many ways to eliminate bugs and pests during the winter months. Most pests flock to warm places to escape the snow, wind, and rain. Your motorhome is a perfect destination for them, so it’s important to use bug traps and pest prevention sprays.
Here’s a list of ways you can pest-proof your RV to prepare it for winter:
- Use a bug bomb. Remove all cushions, food items, cooking utensils, and anything not bolted to the floor or walls. Bug bombs prevent bugs from showing up, and they also kill any bugs that might lay eggs and make a home out of your RV.
- Contact a fumigation service. They can eliminate all of the bugs and other pests in your RV, which is the most efficient method, though it’s usually the most expensive route.
- Seal all of the entrances and exits, then reapply caulk wherever it’s necessary. Loose caulking can cause water leaks and thermal bridges, but it can also invite bugs. After several months of nesting and growing in your RV, these pests will be in every cupboard and piece of furniture in the motorhome.
You should also check the inside of your RV every few weeks.
Although the aforementioned suggestions are almost guaranteed to prevent and remove pests during the winter, it’s better to be safe than sorry. Check under the bed, in each cabinet and drawer, and anywhere else you think bugs might appear.
When you’re done, review this video guide for additional RV bug-proofing tips:
5. Winterize the RV Water Lines
If you leave water in the plumbing system, it can freeze and burst the lines and fittings, so you’ll either need to winterize the lines yourself or call in an expert.
You can save some money if you decide to go the DIY route, but only if you are willing to learn how to do it. Before starting, read the owner’s manual, as this should give you clear and specific instructions for your brand and model of RV.
However, winterizing an RV is something that every RV owner can do themself and should know how to do. Doing so will make you familiar with your RVs water system and make it easier for you to troubleshoot things when needed. Let’s look at the basics of winterizing your RV now.
A. Drain the Water System
Before doing anything else, drain all the tanks in the vehicle, disconnect and drain the freshwater lines and switch off the water pump.
Keep the vehicle connected to a sewer dump, then flush out and empty the black and gray holding tanks. Before storing your RV, you’ll need to clean these tanks. If the black tank flush in your RV is not inbuilt, you can use a flush nozzle or cleaning wand to rinse out and clean inside the tank.
On your fresh water tank, there’s a low point drain that should be opened to let out all the water in the tank.
Close this low point drain after letting out the water.
You won’t need to apply antifreeze inside the tank for fresh water, so ensure that you let every drop of water drain out. After you complete this step, turn off the water heater, then wait for some hours before you move to the next step.
B. Drain the Water Heater
Ensure that the water in the heater is completely cold because as soon as you unplug the drain stopper, the water will gush out. You’ll also want to lower the water pressure. The heaters and faucets should be disconnected from any water source. Once this is done, turn off the water pump and open a hot water tap before draining.
The above action, in addition to the pressure relief device, will ensure that the system is not under pressure during the draining process.
Remember that RVs around the world are built differently, for Europeans or people with smaller vans, it will most likely be similar to me and my videos above, but for Americans, it will differ as your systems are built differently with anode rods and PRVs.
Now for North Americans, open the PRV (pressure relief valve) and remove the anode rod or drain stopper. The water from the heater will be released in a rush, so get out of the way.
After draining the heater, wrap a band of plumber’s tape around the threads of the drain stopper or anode rode and install it back the way it was or replace it if needed. For RVs with inline water filters for drinking water, now is the time to remove them.
Turn off any valves to bypass the lines before you continue.
C. Drain the Interior Lines
Leave the gray tank dump valves open and turn on all the taps. Look for the low-point water drains, open them, and then use the water pump to push out any remaining water in the lines. Keep the water pump on for a few seconds, which should be enough to dry the system.
Close all the drains and turn off the taps. After that, close the gray tank before disconnecting it from the sewer. Wash off the sewer hose and store it.
D. Bypass the Water Heater
Bypassing the water heater will prevent the antifreeze (if you will use it) from getting inside. Water heaters don’t need antifreeze, so you’ll save yourself a lot of time and money by bypassing them.
Follow the bypassing instructions below:
- Locate your water heater in your motorhome.
- Find the bypass valve (a three-way valve with a handle or knob on top).
- Turn the valve’s handle to close the line going into the water heater.
Some water heater bypass valves have an exit and an entrance valve that should be closed to prevent water from backflowing into the water heater. Speaking of which, you can also use a backflow valve, which has a flap that closes to prevent water from flowing backward.
Anyhow there is more about this in my other article that you find here.
E. Bypass the Tank for Freshwater
This is another step most Europeans or vans can skip; much like your RV’s water heater, you don’t need to put antifreeze in the freshwater tank; bypassing the freshwater tank requires the same steps as above.
Just a note, I don’t even use antifreeze; I drain the water system completely and thoroughly.
Close the valve going to the fresh water tank, then make sure there’s a backflow valve to prevent water from flowing backward. The freshwater tank’s bypass valve will be right next to the freshwater tank or near the water pump. You’ll want to check under the main bed in the RV.
View this helpful YouTube video breakdown of bypassing the water heater and fresh water tank in your RV:
F. Flush the Water Lines and Drains With Antifreeze
If you choose to use anti-freeze in your RV, which I don’t recommend in this article, you can find out how to do it without antifreeze; anyway, here’s how to do it with it.
Place the inlet tube of the water pump in a gallon (3.79 liters) of antifreeze and start the water pump to pressurize the system. Open every tap in the vehicle one after the other until you see antifreeze come out of the tap. This will run the antifreeze through the system.
Remember to run it through the cold and hot valves, as it is different water lines. Keep the taps open until the pink antifreeze runs out of the taps, then turn them off. Run the antifreeze through every water line before turning off the water pump.
You’ll want to remove and bypass the tap filter for drinking water before.
Pour at least a cup (0.24 L) of antifreeze down each of the drains to protect them from freezing. Pour two cups (0.48 L) into the toilet and flush, which prevents any remaining water in it from freezing.
Finally, pour another two cups (0.48 L) into the bowl and leave it there.
Conclusion
Winter is not the time to stop caring for your RV, as the season can destroy it before the spring thaw. RV manufacturers have manuals designed to help owners use, maintain and get the best from their vehicles. It will be advantageous to always refer to your manual, even as you try to implement the information in this article.
Sources
- Allstate
- Mowgli Adventures
- Keep Your Daydream
- Gudgear